6 Steps for a Fall Swamp Cooler Changeover
As the leaves start to change and that crisp autumn air arrives in New Mexico, it’s time to prepare your home for the colder season ahead. For many homeowners, that means performing a fall swamp cooler changeover, an essential service that transitions your system from cooling to heating.
Properly winterizing your swamp cooler protects it from cold weather, freezing temperatures, and corrosion, while keeping cold air drafts out of your home. It’s a critical step in maintaining your family’s comfort and ensuring your system stays in good working order year-round.
I’m Andrea Griego from First Rate Plumbing Heating & Cooling, and I’m here to walk you through six professional steps our technicians take to safely and efficiently prepare your evaporative cooler for winter, so it’s ready to start running smoothly again next spring.
 Step 1: Disconnect and Drain the Water Lines
The first step in your fall swamp cooler changeover is to handle the water properly. Any water left in the water lines can freeze when nighttime temperatures drop below zero, causing the pipes to crack or burst.
To prevent freezing, we start by disconnecting the hose that supplies the cooler and ensure all remaining water is drained from the line. This routine maintenance step helps you avoid repairs from leaks or water damage later on.
It’s a simple but important aspect of protecting your system during cold weather and keeping everything properly maintained.
Step 2: Clean and Remove Buildup in the Pan
Over the summer, your swamp cooler pan collects dirt, mineral scale, and rust caused by hard water, especially in areas like Albuquerque and Rio Rancho. This buildup can lead to corrosion and reduce the efficiency of your unit if left untreated.
We take the time to thoroughly clean the pan, removing all deposits and debris. Keeping the base free of buildup ensures your evaporative cooler stays in good condition, minimizing the chance of mold or damage from cold air exposure in winter.
A clean, dry pan in a dry place helps extend the life of your cooler and ensures it’s ready to fill and operate efficiently next season.
Step 3: Turn Off Water and Power
Before we go further, we always make safety the top priority. Step three in every swamp cooler shutdown is turning off both the water and power sources.
We close the water supply valve that feeds the unit, ensuring no more water enters the system, then flip the breaker to disconnect electricity to the evaporative cooler. This step safely eliminates risks of electrical shock, leaks, or the system accidentally powering on during cold months.
Always make sure your unit is completely powered down and water-free before performing any kind of maintenance. It’s a simple safety precaution that protects both your house and your heater.
Step 4: Remove and Inspect the Cooler Pads
The cooler pads, or old pads, are essential for evaporative cooling but can accumulate dirt, dust, and mineral deposits throughout the summer. During your fall changeover, they should be inspected for wear and replaced if needed.
We remove each pad, check for mold, brittleness, or heavy scale buildup, and determine if it’s time for new pads. Pads in good condition ensure your system runs efficiently and safely when you restart it in spring.
Changing old pads now saves you time later and helps your evaporative cooler deliver optimal air quality next season.
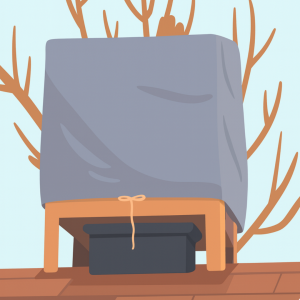 Step 5: Seal Off Ducts and Block Winter Drafts
An unsealed swamp cooler can let cold air seep into your house, making your heating system work harder. Once internal maintenance is done, we move on to sealing the ducts.
Using an insulated cover, we block the vent from the outside. This prevents cold air and elements like snow, dust, and moisture from entering. Proper insulation not only keeps your home warm but also helps you save more money on energy costs during winter.
Think of this as putting a coat on your swamp cooler. It keeps your system protected and your family’s comfort consistent as the seasons change.
Step 6: Switch the Airflow Back to the Furnace
The final step in a fall swamp cooler changeover is to switch your home’s airflow from the cooling system to the furnace or heating system.
Most New Mexico homes with both a swamp cooler and a furnace include a damper in the ductwork that controls airflow. We adjust the damper to close the passage to the cooler and open the one for the furnace, ensuring warm air circulates efficiently throughout your home.
This simple air conversion step prevents cold air from escaping through the swamp vents and ensures your heater operates at maximum efficiency.
For more information, check out the video below to know what to prepare before a swamp cooler changeover:
Leave Your Swamp Cooler Changeover to the Pros
A proper fall swamp cooler changeover involves several detailed steps that must be completed safely to protect your system from cold weather damage. While some homeowners attempt a DIY approach, having licensed technicians perform this essential service ensures every component is inspected and prepared for the New Mexico climate.
At First Rate Plumbing Heating & Cooling, we take pride in providing wonderful service that keeps your swamp cooler and heating systems in good working order year after year. Our experienced team understands how to winterize, clean, and protect your evaporative cooler for the long, chilly months ahead.
Don’t leave it to chance! Schedule your fall swamp cooler changeover today. Call First Rate Plumbing Heating & Cooling to schedule your service by phone or online, and enjoy peace of mind knowing your system is properly maintained for whatever the weather brings.

